

Final Fantasy Mystic Quest Walkthrough
As far as classic role-playing games go, you can't get more important than the original Final Fantasy. FF1 kicks off many of the tropes that are still used in the serial today - merely it also of class features a design conforming of 1987.
That is to say that it can be a niggling obtuse. Sometimes it can be difficult to know where to go next in FF1, how to solve sure puzzles, or even how to navigate its various dungeons without detailed maps. This guide exists to help y'all with all of those things, featuring FF1 maps RPG Site'southward owners crafted years ago on UFFSite, the site'due south Final Fantasy focused predecessor.
This guide isn't focused on strategy - and nosotros in fact have separate pages for many in-depth elements of FF1 such as class composition or boss strategy. Instead, this guide is simply focused on detailing the gild in which you lot should do things - where to go, what to practise, stride-by-step and easy to follow. Nosotros've broken the game into seventeen segments:
So - permit'southward begin. Or every bit the NES original says… "Come!! Start your journey! Return the lite of peace to our world!" First, hither's an FF1 World Map for you to use and reference throughout this journey.

Final Fantasy ane Walkthrough - Table of Contents:
- Cornelia & Getting Equipped
- Garland, the Chaos Shrine, & the Lute
- Witch Matoya, Pravoca Town, & the Pirates
- Sailing, Mini Games, and Elfheim
- Marsh Cave & the Crown
- Crystal Eye, Jolt Tonic, & Nitro Powder - Fundamental Particular extravaganza
- Mt. Duergar & Melmond
- Cave of the Globe / Terra Cave / The Vampire
- The Sage, Terra Cavern II, & Lich
- Crescent Lake, Mount Gulg, & Marilith
- Ice Cavern & how to become the Balloon
- Citadel of Trials & Form Promotions
- Bottled Faerie & Oxyale for breathing underwater
- Sunken Shrine, Kraken, & Rosetta Stone
- Warp Cube & Bell ~ Keys to the Flying Fortress
- Tower of Delusion, Flying Fortress, & Tiamat
- Temple of Chaos
Other Last Fantasy 1 Guides:
- FF1 character name suggestions
- Classes & Jobs in FF1 explained
- The Best Weapons in FF1
- FF1 Magic List
- Class Change - how to change job in FF1
- FF1 Bosses guide
- Complete FF1 Globe & Dungeon Maps

Final Fantasy 1 Walkthrough - Getting Started
Before getting started on the full FF1 walkthrough of where to go and what order to practice things in, you have to actually… become yourself setup. FF1 is an old-school eighties RPG, which ways no set characters - yous have to craft your ain party. That includes naming the FF1 protagonists, and picking their ability sets.
Advertisement. Proceed scrolling for more than
You'll accept a choice betwixt 6 dissimilar archetypal character classes - the Fighter, Black Chugalug, Thief, Blackness Mage, White Mage, and Red Mage. You lot need to choice four classes to brand upwardly your political party - and you lot can have more one of any class if you lot like. Need assistance with this? Click on through to our separate guide on the FF1 classes and the best squad configuration for the gamble to come.
It'due south worth noting, likewise, that every 1 of the six classes has an evolved form that you tin can optionally unlock later on in the game - that likewise changes your abilities. For more on that, read our FF1 job upgrade & class promotion guide.
Once yous've called character jobs and team composition, you'll be dropped into the world of FF1, gear up to begin adventuring. That'due south where this walkthrough kicks off…
1. Cornelia & Getting Equipped

- Yous'll begin on the world map, spawned right outside the castle and boondocks of Cornelia. However, y'all'll spawn into the world relatively weak and vulnerable, so walk due north into town.
- At the very least you tin can talk to people including the King to go a handle on the story, merely the existent reason you're here is to shop. Use your limited starting cash supply to purchase some basic gear from the stores. There's Weapon, Armor, and Item Shops, plus separate stores selling Black and White Magic.
- Throughout this guide, you can consult our FF1 weapon guide and FF1 Magic Listing to see what'south available to you at any given point, and where from.
- There's also Cornelia Castle itself. There'll be some doors and chests you can't open up at this stage, but there's withal one or ii items to be found. Here'south the maps:
- Cornelia Castle 1F
- Cornelia Castle 2F
- We recommend that you buy what you need from the shops, and then head out into the overworld. Don't actually get anywhere - hover around Cornelia and get into some random encounters. Fight, and win.
- We recommend going to level 2 or iii at least. When weakened or when ready, head back to boondocks. You lot'll desire to rest at the Inn there to heal upward, and so spend any further greenbacks you have spare on actress gear or items.
- Whenever y'all're ready, information technology'southward time to move on…
2. Garland & the Chaos Shrine

- Just to the north of Cornelia is your side by side destination, an evil shrine that's known as either the Temple of Fiends, Temple of Chaos, or Anarchy Shrine - depending on the version you lot're playing. When y'all enter, the boss will be waiting for you, right in front of you - but you lot don't have to fight him straight away.
- If you head to the left you'll exist able to find a few treasure chests on a couple of side paths. The paths to the correct are locked at this stage in the game. When ready, step on upwardly to your first boss… Garland.
- When the time comes, head N from the archway to confront the first boss. [Dominate Battle: GARLAND]
- After the boxing, the Princess is rescued. A bridge is opened to the North. Talk to Princess Sarah to get a LUTE, a key particular.
3. Witch Matoya & Pravoca Town
Advertizement. Go on scrolling for more
- After going across the new bridge, caput to the north as much as you can. There'due south a cave around here - Matoya's Cave. Information technology has great music. Matoya is a Witch, and needs a Crystal Eye to restore her sight. Explore, catch some items, and then head E.
- Eventually, y'all'll reach the town of Pravoca. Hither's the Pravoca Town Map, not that you'll demand it.
- Assist the Townspeople out by agreeing to rid the town of the Pirates. [Boss Battle: PIRATES]
- For chirapsia the Pirates, you lot'll get access to a ship. Remember that Pravoca has level 2 spells for auction, equally well as new gear - stock up before leaving.
4. Open Seas to Elfheim

- Now yous have your transport, yous can head to the next destination - Elfheim. Before you practise, all the same, a quick notation on the ship…
- In that location's a mini-game y'all can access one time you take the transport. This can be used to stock up on lots of gold, and y'all tin repeat it.
- Completing the mini-game tin can reward anything from items up to 10,000 Gil. It's a unproblematic sliding puzzle. Articulate it in under 2 minutes for 2000 Gil, under 1 infinitesimal for 5000, or under thirty seconds for ten,000. Hither's how to access the game:
- NES: While on the ship, press A & B together 55 times.
- PS1 Origins: On the ship, press X & Circle together 55 times.
- GBA Dawn of Souls: While on the ship, press A & B together 22 times.
- PSP 20th Anniversary: On the ship, press X & Circle together 22 times.
- 2018 Mobile: On the transport, printing & concur the screen with one finger and then tap 23 times while holding.
- Hd Pixel Remaster: Printing and hold the abolish button (IE B on an Xbox Controller, Circumvolve on a PS Controller) and repreatedly press the Confirm push (IE A / Cross) until the game appears. The Pixel Remaster version of the game has no rewards other than an accomplishment.
- When you're set, to go to Elfheim y'all should go back to Cornelia'due south dock with the ship, then head south with the send until you hitting state. When you exercise hitting country, caput due west. Leave at the next dock, and then get south on pes to find Elfheim.
- In Elfheim yous'll detect more townsfolk with issues yous can solve, plus new weapons and magic to buy.
- Be enlightened the side by side dungeon is toxicant-tastic, then you might want to stock up on potions and Antidotes.
- Become to the Castle and notice the door is locked. Y'all need to get the Crown for the Prince - and that'south to the West.
five. Marsh Cave - Retrieving the Crown
- Leave Elfheim and head Westward. Once you hit the shore, get Southward once more. Eventually yous'll find the archway to the Marsh Cavern, your adjacent dungeon. Here's the Marsh Cave Dungeon Maps:
- March Cave 1F Map
- Marsh Cave 2Fa Map
- Marsh Cave 2Fb Map
- Marsh Cavern 3F Map
- The Marsh Cave is made up of four maps - and some are quite large. Piece of work your way through the dungeon. Here's ancient maps for the NES version we made some ten+ years ago:
- On the final level, y'all'll face off confronting some demonic enemies. [Boss Battle: PISCODEMON]
- In one case they're defeated, open up the breast to get the CROWN. With it in mitt, make your fashion back to Elfheim.
vi. The Crystal Eye, Jolt Tonic, Mystic Fundamental, and Nitro Powder
- Head back to the town of Elfheim, tracing your steps back. You should heal upwards and stock upwardly on items as needed as before long every bit yous get back to the town.
- Northward-West of Elfheim is the Western Keep. Get here and you'll observe another sorta-powerful foe. [Dominate Battle: ASTOS]
- Defeating Astos volition cyberspace you the CRYSTAL EYE that Matoya wanted to restore her sight. You know what's next - make your way back to Matoya. To be safe, consider stopping off at Elfheim to heal before using the boat to go back to Cornelia and then north to Matoya's Cave.
- Giving Matoya the Crystal Eye will go you lot the JOLT TONIC. This can wake Elfheim's Prince, then…
- Head back to Elfheim, and give the Jolt Tonic to the Prince'south assistant.Once the Prince is restored, you will be given the MYSTIC Central, a very handy primal item.
- At this stage, you tin backtrack to numerous areas to get some groovy items from chests and rooms you couldn't open up before simply now can with the Mystic Key.
- First, gead back to Cornelia and striking up the Castle there to get many weapons and armor, all of which are very useful. At that place'south likewise NITRO Pulverization (TNT in some versions), an item required for progression very shortly, so y'all may too get it now.
- The other Mystic Key items are optional:
- Return to the Temple of Anarchy to get two weapons and a prissy item.
- In the Elfheim Castle you tin can get weapons and cash.
- Render to the Western Go on to the n-west for a couple of weapons and an armor slice.
- Dorsum at the Mash Cave dungeon you tin can get cash, a weapon, and armor piece.
vii. Mt. Duergar & Melmond

Advertisement. Continue scrolling for more
- Once you're done gathering whatever items with the Mystic Key, you can head back to your boat and travel West of Cornelia - there's a port waiting for you westwards that'southward non far from Mt. Duergar, your next destination. In older versions of the game, this was simply known every bit the Dwarf Cave. Here's the Mt. Duergar / Dwarf Cavern map.
- Dock at the port and then head to the mountain. In that location'due south some items you can grab here, some of which must be unlocked with the Mystic Key.
- This is where the NITRO POWDER y'all picked up earlier comes into play. A dwarf in the mountain tin can be given this fundamental item, and he'll use it to boom a hole in the world - and that hole tin can be used to sail your ship onwards to new destinations.
- Take your send through the not-and then-carefully crafted gap. Right on through this gap you'll find the town of Melmond, which is your next major destination. Unfortunately, Melmond isn't in the greatest of weather. Still, there'south some new weapons, armor, and spells bachelor for sale in Melmond - y'all might want to pick some up. Here's the Melmond Boondocks Map.
- There'due south a lot of enemies in the side by side surface area that can inflict Petrification, then pick upwards Gold Needle items in order to cure yourself. Adjacent up - the Terra Cavern, aka the Cavern of the Earth!
- Head west along the nearby coast to reach the archway to the Terra Cavern.
8. Cavern of the Earth & the Vampire
- The next step of your quest takes yous to the Cave of the Earth, which in some versions of FF1 is as well known as the Terra Cavern or World Cavern. This is a five-floor dungeon that is dwelling house to one of FF1'south Elemental Fiends, some of the most pregnant enemies in the game. The floors:
- Cavern of the Earth L1
- Cavern of the Earth L2
- Cavern of the Globe L3
- Levels 4 & 5 come in your next visit!
- This is a sprawling dungeon full of treasure and branching paths, every bit you can encounter from the NES-era maps. You can go in many directions when you lot first enter, and though heading to the Eastward will lead y'all towards your objective, you might want to explore further.
- Work your manner through the dungeon - eventually, you lot'll come across a doorway at the end of an otherwise expressionless end. Through the door, you'll detect a new boss battle. [Boss Battle: VAMPIRE].
- Defeat the Vampire in club to become the STAR RUBY. This is an easy dominate encounter, as since he's an undead enemy you lot can cast restorative spells on him to deal damage.
- After getting the Star Ruby from the chest, backtrack and get out the dungeon - you can't go any further for now.
9. The Sage, Terra Cavern 2, & Lich
- Once you're out of the Terra Cavern with the red in manus, you need to caput to Titan's Cave. At that place might not exist whatever summons in FF1, only some familiar faces show up in this manner!
- Within the Titan's Cavern, give the STAR RUBY to the Titan. The Titan will move aside and let you into areas to pick up some treasure. Exercise that.
- Go out the Titan's Cave through the exit to the left of the expanse behind the Titan. Follow this road to the Sage's Cave and conversation to the Sage inside. He gives you the Earth ROD.
- At present it'southward time to head dorsum to the Terra Cavern. You might desire to stop off at Melmond first to heal - then return to where you battled the Vampire boss. With the Earth Rod, you lot can now go along - in some versions, y'all'll demand to really use the Globe Rod on the stone tile at the expressionless end to open upwardly the side by side area:
- Cave of the Earth L4
- Cave of the Earth L5
- Keep working through the Terra Cavern. Somewhen, a door volition lead to a terminal room where there's the World Crystal and a challenging battle. [Boss Battle: LICH, FIEND OF Globe].
- With the Lich defeated, your work in the Terra Cavern is done. You can explore the dungeon for more treasure if you like, or leave. Don't forget you tin can teleport out with a portal in the Crystal Room.
10. Crescent Lake, Mountain Gulg, & Marilith
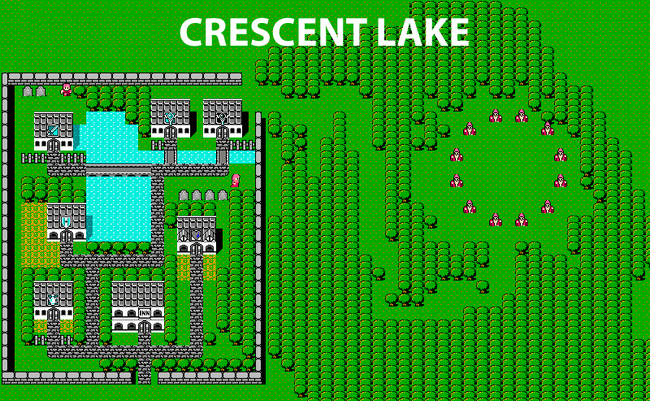
- You demand to head dorsum to your ship, and you may as well go via Melmond. Use Melmond to heal up, then take your send s, following the declension and ignoring the path Titan fabricated upward. Somewhen y'all'll be able to travel east - exercise so until you achieve a port.
- This port is just to the n of Crescent Lake, a new town. Caput south to reach information technology. Equally e'er, bank check out the weapon, armor, and spell stores, and stock up on perishable items.
- Use the hidden path in the top-right corner of the Crescent Lake town map to reach a unique immigration on the east where there'southward a bunch of Sages. Talk to all 12 Sages and they'll give you a CANOE.
- The Canoe is some other globe map travel upgrade; it lets yous walk across shallow water similar rivers. There'southward an obvious path to follow correct exterior Crescent Lake - do that to be led to the pes of a volcano - Mt Gulg, your next dungeon. In other versions, this was also known as Gurgu Volcano.
- Mt. Gulg is a dungeon with a gimmick - and that gimmick is "liquid hot magma". Lava. You can walk on the Lava to avoid random encounters - but every step deals impairment to you. Walking on Lava is a necessity to make your way through this dungeon, but exactly how much yous do it is your choice. Here'southward the dungeon map:
- Mt. Gulg L1 Map
- Mt. Gulg L2 Map
- Mt. Gulg L3 Maps: L3A / L3B
- Mt. Gulg L4 Maps: L4A / L4B
- Mt. Gulg L5 Map
- Partway through the dungeon yous'll take a forced encounter against a dragon enemy. It'due south not quite a boss, but permit'southward list it as one anyway. [Boss Battle: Scarlet DRAGON].
- At that place's a fair amount of treasure throughout this dungeon, but it'due south quite manageable to get through. Simply call back to keep topping upwardly your health with items whenever the lava and encounters whittle it downwardly.
- The final area of the Mountain Gulg is a room with eight different directions, with you starting in the centre. Many directions take treasure, but South-W is where you'll find the next large battle. [Boss Boxing: MARILITH, FIEND OF FIRE].
- In one case Marilith is downward, practise what you've gotta with the Fire Crystal and so leave the dungeon. Again, yous can explore more than if you want - or use the teleporter in the crystal room.
11. Ice Cavern & How to get the Airship
- From fire to ice - the Ice Cavern now awaits as your next destination. Go back to Crescent Lake to heal, then return to your boat. Follow the coast to the n, and eventually you'll achieve a port. Now accept the shallow waters to become to yet some other cave dungeon.
- This is a pretty simple dungeon, and is smaller than other contempo ones. The gimmick hither is cracks y'all tin can fall through to travel from one floor to the next. At that place are, naturally, a agglomeration of items scattered throughout the dungeon. There's a lot of cash in particular - and since this dungeon's boss is easy, you lot should explore and suffer the random encounters. Hither's the maps:
- Water ice Cavern L1
- Water ice Cavern L2 Maps: L2A / L2B
- Ice Cavern L3 Maps: L3A / L3B
- In one room, stepping on a crack almost 3 chests will pb to the goal of the Water ice Cavern, which is a room where you'll fight the Evil Heart, i of the easiest bosses in all of FF1 - if you can even phone call information technology a boss [Boss Boxing: EVIL EYE].
- One time the Evil Center is defeated, you can catch the LEVISTONE. This is a key item to continue. Leave the Ice Cavern.
- The Levistone is an of import particular because it lets you unlock a Final Fantasy staple - the airship! Get back to Crescent Lake, and and so head South from there to detect a wide open desert. This is the Lykion Desert, a primal destination - and the start of a major FF tradition.
- While standing in the desert, select and use the LEVISTONE from your menu. The AIRSHIP appears in the middle of the desert!
Advertising. Keep scrolling for more
12. Airship Adventures: Citadel of Trials & Class Promotions

- At present that yous take access to the airship, you can fly around the globe with ease. This unlocks new places to go and new things to practise - including optional items. Here's some stuff yous should practice with the balloon:
- Stock up on gear, spells, and items: you tin now fly back to whatever town you lot've previously visited, plus visit Gaia, a small town surrounded by impassable mountains you tin now fly over with your airship. Gaia sells new items, including some high level magic and the very useful Protect Ring, which guards against instant expiry attacks. Merely exist aware yous'll before long need fifty,000 Gil spare to progress the story.
- Next upward, you want to get your Class Promotions. This powers up each of your characters and unlocks new moves. To outset this procedure, go to the Citadel of Trials, which is found on the western side of the top-correct continent. It looks similar a castle, and you won't be able to state close to it - country equally nearby as y'all can, and then walk the rest of the way. In older versions of the game, this was chosen the Castle of Ordeals. Here'south the map:
- Citadel of Trials L1 Map
- Citadel of Trials L2 Map
- Citadel of Trials L3 Map
- In the Citadel, sit on the Throne to be teleported into the Citadel proper. There's a teleportation gimmick and puzzle here:
- Proceed stepping on the teleport tiles until you have a selection betwixt ii of them. When that happens, selection the southern warp signal.
- Adjacent, pick the southern warp bespeak again.
- After that, choose the eastern warp betoken.
- Caput to the east after that warp indicate for some loot, so head south via the western parth. This leads yous to a teleportation point, so some stairs.
- You lot'll have a battle here [Boss Battle: DRAGON ZOMBIES], then you'll exist able to pick upwards the RAT TAIL, a fundamental item needed for the grade upgrade,
- Become back to your airship and head just south-w of the Citadel of Trials. There's some islands hither, each with a cave of sorts on information technology. Explore them all for boodle - but i of them is the home of Bahamut, Rex of Dragons - another summon with a small story role.
- Give Bahamut the Rat Tail and he will upgrade your character classes. Yous can learn more than nigh the class change in our full FF1 job upgrade and class promotion guide.
13. Trading Quest to exhale Underwater

- If you didn't visit Gaia before, you should find the mountain-flanked boondocks now. With your upgraded classes y'all can buy even more gear and magic to equip - but again, call back that you'll need fifty,000 Gil to go along…
- From Gaia, head due east until you see another desert area. Land your airship and look for a unique tile of desert flanked by an oasis of trees. Enter it; this is really an area, the Desert Caravan.
- Inside the Desert Caravan, buy the BOTTLED FAERIE for fifty,000 Gil. This is a central item to proceed.
- Go back to Gaia and move to the northernmost house there, then head eastward and around to find a small lake. Stand in forepart of the lake and select the BOTTLED FAERIE from the menu; this volition swap information technology for some other fundamental item, OXYALE. You demand this to exhale underwater for the next area of the game.
- South-eastward of Gaia and surrounded by forests is another town, Onrac. Wing there and enter the boondocks by landing exterior the forest and walking. As well as new gear and spells to buy, in the south-e of the town you can enter a Submarine -- and head to the Sunken Shrine. It'southward time to tackle the water fiend!
14. The Sunken Shrine, Kraken, & the Rosetta Stone
- The Sunken Shrine is your latest dungeon, and information technology'southward the largest yet. In other versions this was known, quite but, every bit the Sea Shrine.
- It's split across 9 unlike maps, and there's a lot of good treasure worth grabbing including weapons, armor, lots of greenbacks, and the admittedly essential Ribbon item, which protects against and and all status furnishings. Here'southward the map:
- Sunken Shrine Map L1
- Sunken Shrine L2 Maps: L2A / L2B
- Sunken Shrine L3 Maps: L3A / L3B
- Sunken Shrine L4 Maps: L4A / L4B
- Sunken Shrine L5 Map
- Among the loot in the Sunken Shrine is the ROSETTA Stone. You need to make sure y'all pick upward this particular in this dungeon - y'all need information technology to progress. If you terminate the Sunken Shrine without getting it, you'll demand to get back for information technology - it's on L5, in one of the rooms with a trio of chests.
- Deep in the dungeon, you'll find the familiar sight of a crystal chamber with the Water Crystal and its guardian, leading to a fight [Boss Battle: KRAKEN, FIEND OF WATER]. This is arguably the most difficult of the four fiends in FF1.
fifteen. Warp Cube, Rosetta Stone, and Bong - keys to the Flying Fortress
- Subsequently completing the Sunken Shrine, observe yourself back exterior Onrac. Use your canoe to head north from that boondocks - and into the waterfall. This leads to another mini-dungeon, the Waterfall Cave. Here'south the maps:
- Waterfall Cavern Dungeon Map
- There's some solid treasure in this dungeon, only deep in it you'll also detect a robot. Talk to it to get the WARP CUBE, another central particular yous'll demand to get to FF1's side by side major dungeon.
- Make your way beyond the world and dorsum to the town of Melmond. Hand over the Rosetta Stone to the scientist NPC (due north well-nigh the graves) and he'll teach y'all the language spoken in the boondocks of Lufenia. Here'south the Lufenia Town Map:
Advertizement. Keep scrolling for more than

- Lufenia is on the eastern side of the earth, on a minor peninsula merely e of the large desert. Enter the boondocks, and yous'll notice the usually expected new selection of armor, weapons and spells for sale.
- Chat up every NPC you can find in Lufenia and one will eventually paw over the BELL. This is the final key item needed to access the dungeon where the final elemental fiend resides.
16. Tower of Mirage & Flying Fortress
- To attain the Tower of Mirage, just fly to the huge desert that dominates the n-eastern side of the map (west of Lufenia) - the tower is the merely structure in that location.
- Enter the tower of mirage, which in some other versions is simply called Mirage Tower. Here'southward the Belfry of Mirage dungeon map:
- Tower of Mirage L1
- Tower of Mirage L2
- Tower of Mirage L3
- There's a challengine enforced fight against a Blue Dragon here. Similar the other dragons it'south not quite a boss really, only we feature it on our dominate guide anyway [Dominate Boxing: BLUE DRAGON].
- Explore the belfry in total as per our map. When ready footstep on the teleportation warp tile to be taken to the Flying Fortress, cheers to utilise of your WARP CUBE key detail.
- The Flying Fortress is a five-level dungeon that is every bit always full of boodle to gather and regular enemies to fight. In other versions of FF1, it's soemtimes chosen the Sky Castle or Floating Castle. It's worth noting that it's all teleporters here - yous're looking for those warp tiles, non stairs. Hither's the Flying Fortress maps:
- Flight Fortress L1
- Flying Fortress L2
- Flight Fortress L3
- Flight Fortress L4
- Flying Fortress L5
- Every bit with the Sunken Shrine, in that location'southward one slice of loot you desire to make sure you get: the ADAMANTITE. This is optional, just picking this upwardly in the Flying Fortress is required to get i of the best weapons in FF1.
- Flying Fortress is domicile to the Warmech, which isn't technically a boss boxing but is the hardest enemy in the game - and so let's phone call it a dominate anyway. [Dominate Battle: WARMECH]. If you're lucky, y'all won't run across it at all.
- On the same floor where Warmech can exist a random encounter is your true boss of this dungeon - a challenging encounter with Wind Fiend Tiamat [Dominate Battle: TIAMAT, FIEND OF AIR].
- With the Sky Fortress washed, return to the overworld. If y'all missed any spells or need more than items, now is the fourth dimension to stock up and spend your greenbacks.
- If you picked up the Adamantite, accept it to Mt. Duergar and give it to the Blacksmith. He'll use it to craft the Excalibur, the second most powerful weapon yous can get.
- Become to a boondocks of your choice to heal upward. Information technology'south nearly time for the yard finale.
17. Temple of Chaos
- It all ends where it started. Sort of. Head to the Temple of Chaos, which is of course just northward of Cornelia. Inside the temple, you volition use the power y'all've accrued to time travel, 2000 years into the past.
- The past version of the Temple of Chaos is ultimately just some other dungeon. Explore and piece of work your fashion through it. When yous reach a stone tile, you need to utilize the LUTE from your carte - the fundamental item yous got off the princess all the way at the get-go - to keep.
- You will at present piece of work your manner through themed floors. What follows is a boss rush. [Boss Battle: LICH, MARILITH, KRAKEN, & TIAMAT rematches]. At that place'southward some good items on these floors - here'southward the maps, though they're basic:
- Temple of Chaos Map L1
- Temple of Chaos Map L2
- Temple of Anarchy Map L3
- Temple of Anarchy: Earth Level Map
- Temple of Chaos: Burn down Level Map
- Temple of Chaos: Water Level Map
- Temple of Chaos: Air Level Map
- Temple of Anarchy - Final Map
- Get past all of the Fiends of the Elements and you tin can finally face off against Chaos, the last boss of the game [Boss Battle: Chaos] Skilful luck - once you beat him, credits roll on this ballsy adventure!
Source: https://www.rpgsite.net/feature/11508-final-fantasy-1-walkthrough-where-to-go-dungeon-maps-ff1-step-by-step-guide
0 Response to "Final Fantasy Mystic Quest Walkthrough"
Post a Comment